Welcome to the continued exploration of form-based authentication with Ktor. Today’s post delves into session management—a feature that enables the persistence of user data across multiple HTTP requests. Session management allows users to securely access protected resources after initial authentication. Once the user logs in, the server persists user data and automatically re-authenticates users on subsequent requests. This is not only convenient from a user’s perspective but also reduces the risk of credential interception, a vulnerability inherent in basic authentication.
This post is a part of a hands-on tutorial. Feel free to check out the project and code along with me.
Table of Contents
- How Does Session Management Work?
- Enabling Session Management in Ktor
- Creating User Sessions
- Storing User Sessions
- Protecting Session Data
- Summary
How Does Session Management Work?
Session management is a technique that enables the persistence of user data across multiple HTTP requests in web applications. It ensures secure and seamless user access to protected resources without requiring re-authentication for each request.
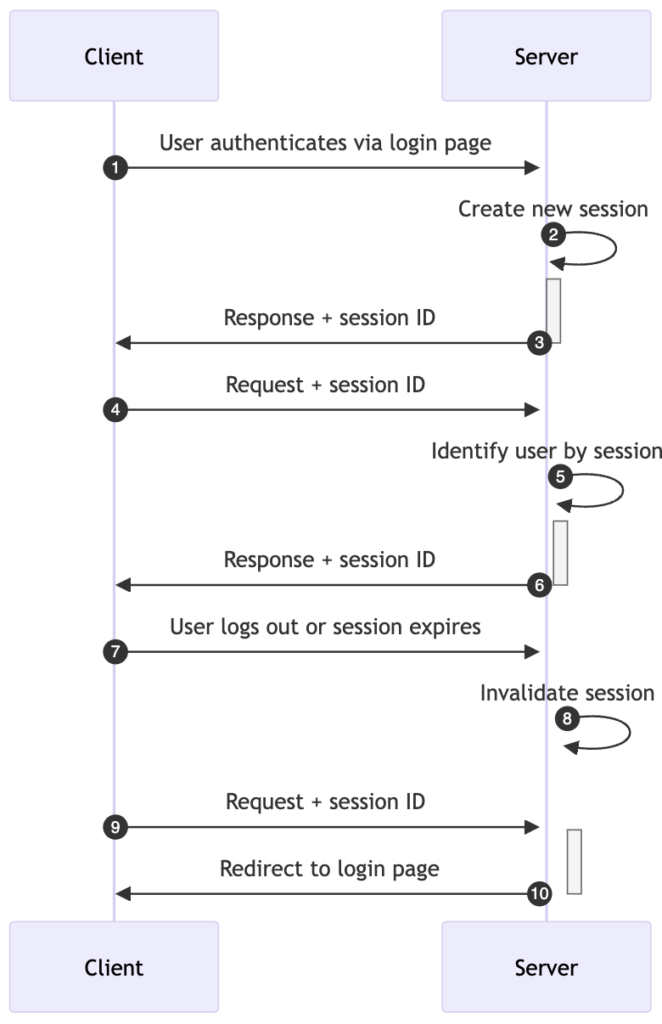
Session management generally works as follows:

- User logs in: The client sends a request with login credentials (usually username and password) for authentication. The server verifies the provided credentials against the stored user data (which could be in a database or other data store).
- Server creates a new session: If the verification is successful, the server creates a new session. This involves generating a unique session ID.
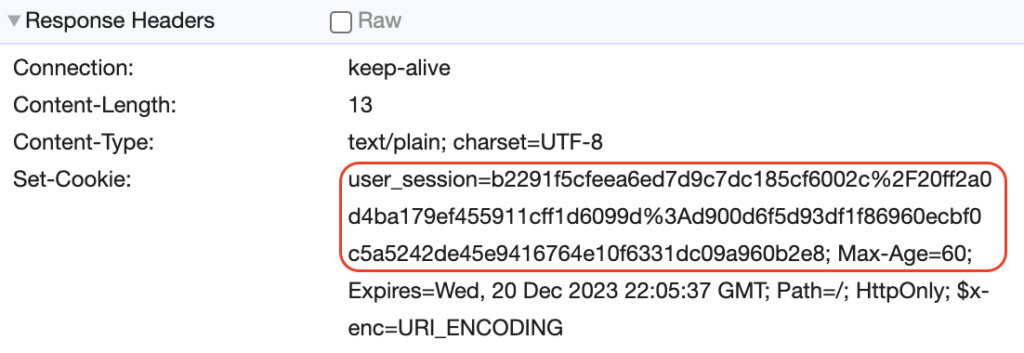
- Server sends session ID to the client: The server then returns this unique session ID to the client, often as a part of the HTTP response in the form of a cookie.
- Client stores session ID: The client (usually a web browser) stores this session ID in a cookie and sends this cookie with all subsequent HTTP requests.
- Server validates session ID: For each subsequent request, the server validates the session ID provided in the cookie. This session ID is used to retrieve the user’s session data stored on the server.
- Interaction continues: If the session ID is valid, the server allows the user access to resources and continues to interact with the client based on the stored session information.
- Session eligible for termination: Eventually, the user logs out or there is a period of inactivity.
- Session termination: When the user logs out or after a certain period of inactivity (defined by a session timeout setting), the server will destroy (invalidate) the session.
Points 9. and 10. depict a communication using a session ID that is no longer valid. In this case, the server rejects the client request and redirects the user to the login page.
Enabling Session Management in Ktor
To enable support for sessions include the ktor-server-sessions plugin in the build script.
implementation("io.ktor:ktor-server-sessions:$ktor_version")As the next step, you install and configure the plugin. The trick is to use sessions alongside the form-based authentication we created in the previous post.
Note: The complete example is available on GitHub.
import io.ktor.server.auth.*
import io.ktor.server.sessions.*

install(Authentication) {
    form("auth-form") {
        // See the previous post for details
    }
    session<UserSession>("auth-session") {
        validate { session ->
            if (session.name in users) {
                session
            } else {
                null
            }
        }
        challenge {
            call.respondRedirect("/login")
        }
    }
}

install(Sessions) {
    cookie<UserSession>("user_session") {
        cookie.path = "/"
        cookie.maxAgeInSeconds = 60
    }
}
The code above builds on top of our previous efforts. The users is a collection of user credentials. Whereas the UserSession is a custom data class holding information about an authenticated user.
import io.ktor.server.auth.Principal

data class UserSession(val name: String) : Principal
Principal is just a marker interface which allows to plug our custom session class into Ktor’s security config.
Creating User Sessions
A successful login results into a new user session created and stored on the server.
routing {
    authenticate("auth-session", "auth-form") {
        get("/") {
            call.respondText("Hello, ${call.principal<UserSession>()?.name}!")
        }
        post("/login") {
            val username = call.principal<UserIdPrincipal>()?.name
            username?.let { call.sessions.set(UserSession(it)) }
            call.respondText("Hello, ${call.principal<UserIdPrincipal>()?.name}!")
        }
    }
    get("/logout") {
        call.sessions.clear<UserSession>()
        call.respondRedirect("/login")
    }
}
We take the principal that represents the authenticated user and create a new session using call.sessions.set. From now on, the server keeps track of the session and invalidates it only when the user logs out or when the session expires due to inactivity.
Storing User Sessions
When the server receives an incoming request, it typically returns a unique identifier for the user session. This identifier is subsequently used by the client with each request to access user-specific content on the server. As for the storage of session data, its location differs based on the particular system and its configuration. It could reside in server’s memory, the file system, or an external database, depending on the need for scalability and robustness.
In Memory
In our tutorial, session data are stored in-memory. Please note that this is suitable for development purposes only.
import io.ktor.server.sessions.SessionStorageMemory

cookie<UserSession>("user_session", SessionStorageMemory()) {
    cookie.path = "/"
    cookie.maxAgeInSeconds = 60
}
In the File System
Another option is storing data on the disk.
cookie<UserSession>(
    "user_session", directorySessionStorage(
        rootDir = File("./build/sessions"),
        cached = true
     )
) {
    cookie.path = "/"
    cookie.maxAgeInSeconds = 60
}
Once a user logs in, the server creates a new session and stores its content in the appointed directory as a text file. The data is stored in plain text:
name=%23suser1Custom Storage
You’re welcome to provide a custom storage. You do so by implementing the SessionStorage interface.
Protecting Session Data
Until now, we’ve only been passing a session ID to the client—a protocol-secure process that shields the actual session data from the client’s access. However, if there’s a need to make the session data directly accessible in the browser, it’s possible to bypass the session storage. By omitting the storage option within Ktor, the system will automatically expose the session data to the client instead of merely passing the session ID.
    install(Sessions) {
        cookie<UserSession>("user_session") { // No storage specified
            cookie.path = "/"
            cookie.maxAgeInSeconds = 60
        }
    }
Skipping the session storage makes user data directly accessible in the browser.

Given that session data is transmitted across network, there’s always a concern about potential interception and misuse. To help alleviate this risk, Ktor provides a feature that allows you to encrypt the session data that’s being transferred. This additional layer of security enhances the protection of sensitive data during transit.
Please note, the encryption provided by Ktor is focused on the transmission of session data, e.g. as encrypted cookies. This provides protection during transit, but the responsibility for the encryption of data at rest often falls to the data storage system, not the framework itself.
For data at rest stored in databases or other storage systems, these systems usually offer their own mechanisms for data encryption. It is a good security practice to implement encryption for sensitive data at rest in storage, and there are numerous methods to achieve this such as Transparent Data Encryption (TDE), column-level encryption, or file-level encryption depending on your storage system.
In order to protect the session data from unauthorized access, Ktor lets you sign and encrypt the data before they’re sent over the wire. Let’s add a configuration block to our application.conf file that deals with encryption.
    auth {
        form {
            usersFile = "users.properties"
        }
        encryption {
            sign-key = ${SIGN_KEY}
            encrypt-key = ${ENCRYPT_KEY}
        }
    }
As you can see we rely on environment variables to store the actual values of the signing and encryption key.
Next, let’s instruct Ktor to automatically sign and encrypt the transported session data.
    val encryptionConfig = environment.config.config("ktor.auth.encryption")
    install(Sessions) {
        val encryptKey = hex(encryptionConfig.property("encrypt-key").getString())
        val signKey = hex(encryptionConfig.property("sign-key").getString())
        cookie<UserSession>("user_session") {
            cookie.path = "/"
            cookie.maxAgeInSeconds = 60
            transform(SessionTransportTransformerEncrypt(encryptKey, signKey))
        }
    }
From now on, the user data is encrypted.

Summary
In today’s post, we have delved deep into session management with Ktor. You should now have a solid understanding of how the server handles user data and the methods through which it can be securely accessed by the client. Ktor provides a flexible toolbox that lets you manage user data in a the most suitable way given your specific use case.
Thank you for reading. Stay tuned for our next episode, where we will further enhance security measures with the implementation of JSON Web Tokens.


