Welcome to the latest instalment in our series on implementing authentication with Ktor. In the previous post, we delved into the intricacies of basic authentication. Today, we’re enhancing our security measures by addressing one notable drawback — the need to pass user credentials with each request. By the end of this post, you’ll understand the workings of form-based authentication and why it’s a superior choice over basic authentication.
This post is a part of a hands-on tutorial. Feel free to check out the project and code along with me.
Table of Contents
- What is Form-Based Authentication?
- How Does It Work?
- Enable Form-Based Authentication in Ktor
- Store User Credentials
- Configure Security
- Design Login Form
- Add Protected Resource
- Run It!
- Session Management: Stay Tuned!
What is Form-Based Authentication?
Form-based authentication is a technique where users supply their credentials via a form which is typically located at the login page. Once the user submits their details, the server verifies the entered credentials and if they’re correct, it responds back with a session cookie. This cookie is then used for authenticating all subsequent requests. Unlike basic authentication, form-based authentication doesn’t require credentials to be included with each request. This is a major security improvement.
How Does It Work?
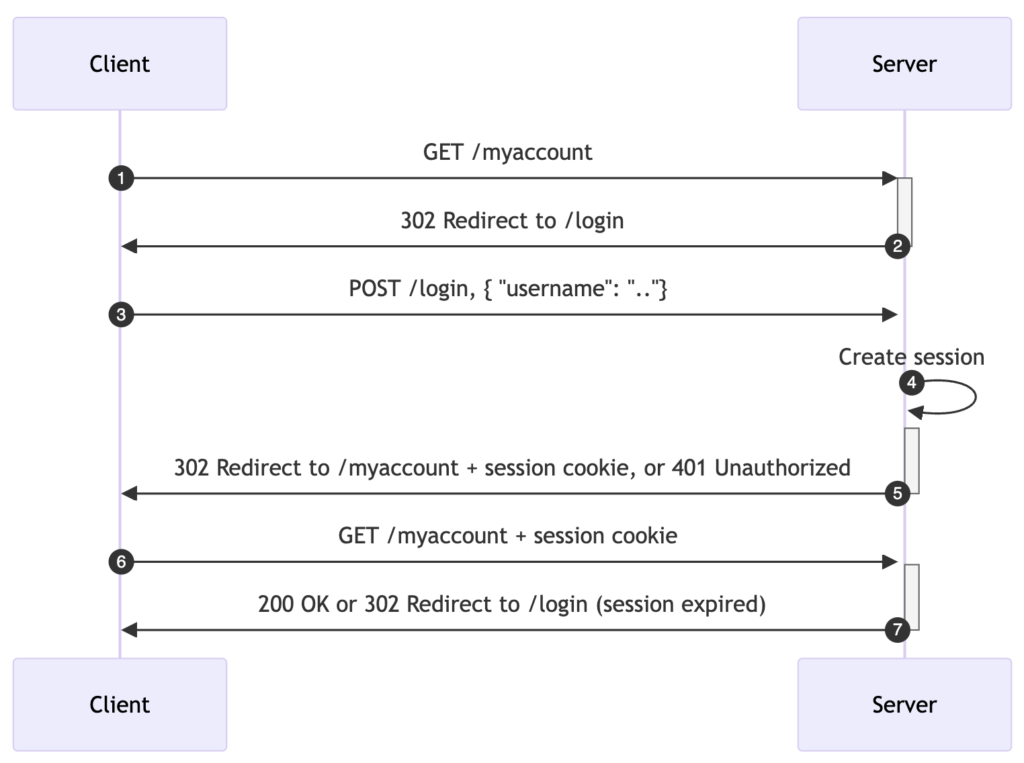
Here’s how form-based authentication works in a nutshell.

- Client sends an HTTP request: The client tries to access a protected resource – account details.
- Server redirects the client to a login page: Form-based authentication works by asking users to provide their credentials via an HTML form, usually placed on a login page. The form fields, typically a username and a password field, send the inputs to the server when the form is submitted.
- The user fills in their credentials: The user submits the login form passing the requested credentials.
- Server validates the user’s credentials and creates a session: The server validates received credentials. If they’re valid, the server creates a session which, unlike in basic authentication, does not demand re-entering of credentials with each HTTP request.
- Server redirects the authenticated user to the requested resource: The user session is generally preserved with the help of a session cookie.
- Automatic authentication via a session cookie: When the (authenticated) user attempts to access other protected resources on the web application, the cookie is automatically sent with the HTTP request.
- Server redirects the user request: In case the session cookie is valid, the server redirects the user to the requested resource. Once the cookie expires, the user is redirected to the login page.
As you can see, form-based authentication offers improved security as it usually involves sessions. When the security of your resources is dependent on sessions, form authentication can provide a stronger security layer.
Secondly, basic authentication sends the username and password in plaintext with each HTTP request. Although this information is encoded using Base64, it isn’t encrypted, which is a security concern as we’ve seen in the previous post. Form-based authentication doesn’t suffer from these security weaknesses because it doesn’t have to send the username and password with each request.
Lastly, form-based authentication provides a better user experience as it allows for flexibility when designing the login page.
Enable Form-Based Authentication in Ktor
In our previous lesson, we explored the authentication add-on in Ktor. Now, our first crucial step is to include the following dependency:
implementation("io.ktor:ktor-server-auth-jvm")Next, we need to install the add-on and configure it. Here is a simple setup taken from the documentation.
install(Authentication) {
    form("auth-form") {
        userParamName = "username"
        passwordParamName = "password"
        validate { credentials ->
            if (credentials.name == "jetbrains" && credentials.password == "foobar") {
                UserIdPrincipal(credentials.name)
            } else {
                null
            }
        }
        challenge {
            call.respondRedirect("/login")
        }
    }
}
While this example allows you to quickly understand how things work, there’s space for improvement. Namely, rather than hard-coding user credentials, consider loading them from an external storage for improved security and easy maintenance.
Store User Credentials
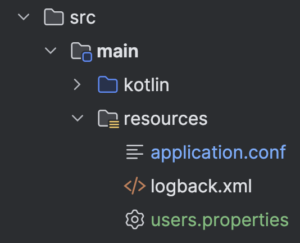
We’ve explored in depth how to best load user credentials from a file in the previous post. Just like before, there’s users.properties containing usernames and passwords.
user1=secret1
user2=secret2
user3=secret3
Here is how src/main/resources folder should look like at this stage.
Next, add a new section to application.conf and reference the users file.
auth {
    form {
        usersFile = "users.properties"
    }
}
Configure Security
Having means of loading credentials we are ready implement the validation of incoming requests.
Note: The complete example is available on GitHub.
Let’s start with loading and interpretation of the application config.
fun Application.configureSecurity() {
    // The relevant part of application configuration is the following:
    val authConfig = environment.config.config("ktor.auth.form")

    // Usernames and passwords are read from the configuration file:
    val usersFile = authConfig.property("usersFile").getString()

    // Load the users from the file. In this example, the file is a simple text file:
    val users = loadUsers(usersFile)
}
Next, we update the configureSecurity extension method with request validation.
install(Authentication) {
    form("auth-form") {
        userParamName = "username"
        passwordParamName = "password"
        validate { credentials ->
            if (credentials.name in users &&
                credentials.password == users[credentials.name]
            ) {
                UserIdPrincipal(credentials.name)
            } else {
                null
            }
        }
        challenge {
            call.respondRedirect("/login")
        }
    }
}
Ktor verifies each incoming request in accordance with the conditions specified in the validate block. In this process, it takes credentials from the submitted login form and constructs the Credentials object for you.
Design Login Form
In contrast with some other web frameworks, there’s no default login screen in Ktor. So, let’s create a /login route and generate a HTML form that allows to submit user credentials.
Note: The complete example of routing is available on GitHub.
For simplicity, we will use a plugin that enables to generate HTML on the server:
implementation("io.ktor:ktor-server-html-builder:$ktor_version")Next, let’s add the /login route with a custom login form.
get("/login") {
    call.respondHtml {
        body {
            form(action = "/login", encType = FormEncType.applicationXWwwFormUrlEncoded, method = FormMethod.post) {
                p {
                    +"Username:"
                    textInput(name = "username")
                }
                p {
                    +"Password:"
                    passwordInput(name = "password")
                }
                p {
                    submitInput() { value = "Login" }
                }
            }
        }
    }
}
Add Protected Resource
Let’s add an endpoint that displays the name of the logged-in user. The principal object either contains details of the authenticated user, or it remains null in case the visitor is anonymous. For the purpose of this tutorial, we simply display the name of the authenticated user, as soon as the login is successful.
authenticate("auth-form") {
    post("/login") {
        call.respondText("Hello, ${call.principal<UserIdPrincipal>()?.name}!")
    }
}
Run It!
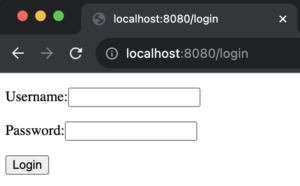
Let’s now test our implementation and see how form-based authentication works to protect our resources. In your browser, navigate to http://localhost:8080. Here’s what you should expect.
Since we haven’t authenticated, the server redirected us to the login form. Inspecting network logs reveals the redirect.
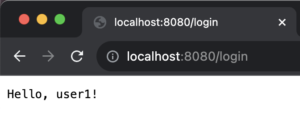
Once the user logs in using the correct credentials, the server displays a personalised welcome message.
Session Management: Stay Tuned!
Although our implementation appears to work just fine, it contains a significant flaw. Our server does not handle user session management. This is a problem because whenever users attempt to access a protected resource, they will be repeatedly prompted to log in, due to the absence of proper session management.
In the upcoming episode of this tutorial, we will enhance our form-based authentication example by incorporating user management. This addition will enable us to fully exploit a custom login flow that is not only user-friendly but also secure.
Thanks for reading and as usual, you can find the complete project on GitHub.


